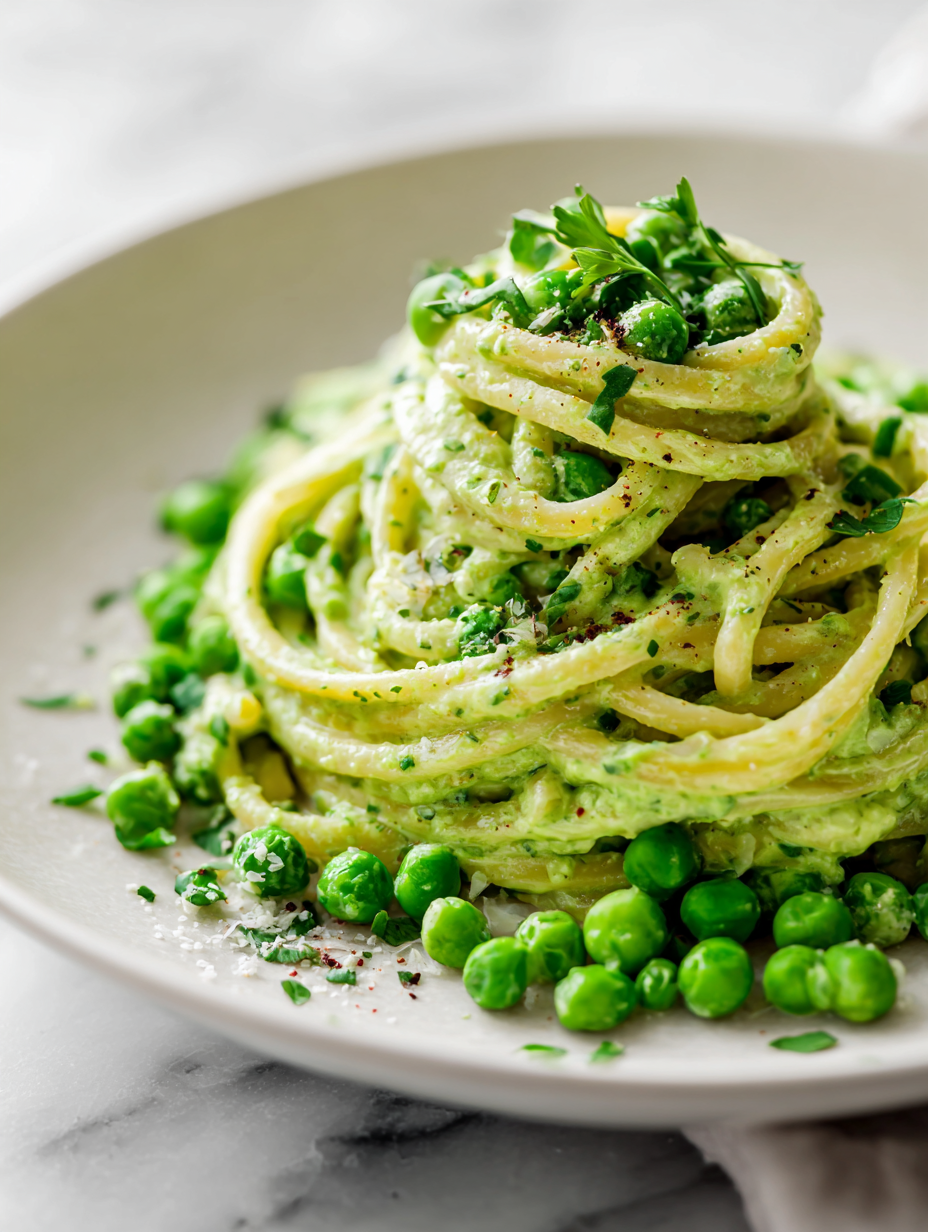
This creamy pea pasta is my go-to when I want something that feels like spring on a plate, but without the fuss. The natural sweetness of fresh peas really shines through, turning a simple dish into a little celebration of fleeting green bounty. It’s honest, quick, and honestly, a bit addictive once you get the hang of balancing the bright peas with creamy goodness.
I love how this dish comes together in under 20 minutes, making it perfect for a rushed weeknight or an impromptu dinner. The trick is to use fresh peas whenever possible—they bring this vibrant, slightly grassy flavor that frozen just can’t match. And the cream? It’s just enough to coat everything in velvety richness, making each bite feel indulgent but still fresh and lively.
Focusing on how the natural sweetness of fresh peas can elevate a simple pasta dish, making it a celebration of spring’s fleeting bounty with minimal fuss.
The story behind this recipe
- This recipe sprouted from a late spring afternoon in my backyard, where I was surrounded by a burst of green and that sharp, sweet scent of fresh peas just picked. I remember tasting a spoonful straight from the pod, feeling that burst of sweetness, and thinking, how could I build a dish around this moment?
- It’s become a ritual to keep a bowl of fresh peas in the fridge during that fleeting season, just waiting for a quick pasta fix. The simplicity of blending their fresh, grassy flavor with creamy elements makes me feel like I’m capturing a tiny bit of spring’s magic in every bite.
- heading: ‘The story behind this recipe’
Breakdown of Key Ingredients
- Fresh peas: I love the pop of sweetness they bring, especially when freshly shelled. If you can’t find them, frozen works, but try to avoid dried—nothing beats that bright, juicy burst.
- Pasta: I prefer a short, ridged shape like orecchiette or fusilli to hold onto the sauce. If you only have spaghetti, that’s fine—just toss and turn until coated. Cook until al dente, about 8-10 minutes, for a perfect bite.
- Cream: I use heavy cream for richness, but a splash of half-and-half can lighten it up without sacrificing too much velvety texture. If dairy’s an issue, a good cashew cream can mimic the smoothness—just blend until silky.
- Garlic: I crush and sauté until fragrant—about 30 seconds—then add the peas. It’s that aromatic hit that ties everything together, so don’t skip it. If you prefer milder, halve the garlic or use garlic powder at the end.
- Lemon juice: A squeeze brightens the whole dish, making the sweetness of peas sing. Skip it if you want a more subdued flavor, but trust me, that zing lifts everything. Use fresh lemon for best aroma and vibrancy.
- Olive oil: I drizzle a little extra virgin at the end for a glossy finish and a flavor boost. If you’re out, a dash of butter adds richness—just watch it melt in, spreading that cozy warmth through every bite.
Spotlight on Key Ingredients
Fresh peas:
- I love the pop of sweetness they bring, especially when freshly shelled. If you can’t find them, frozen works, but try to avoid dried—nothing beats that bright, juicy burst.
- Pasta: I prefer a short, ridged shape like orecchiette or fusilli to hold onto the sauce. If you only have spaghetti, that’s fine—just toss and turn until coated. Cook until al dente, about 8-10 minutes, for a perfect bite.
Cream and lemon:
- Cream: I use heavy cream for richness, but a splash of half-and-half can lighten it up without sacrificing too much velvety texture. If dairy’s an issue, a good cashew cream can mimic the smoothness—just blend until silky.
- Lemon juice: A squeeze brightens the whole dish, making the sweetness of peas sing. Skip it if you want a more subdued flavor, but trust me, that zing lifts everything. Use fresh lemon for best aroma and vibrancy.
Notes for ingredient swaps
- Dairy-Free: Swap heavy cream for coconut cream or cashew cream. Expect a slightly nuttier, less rich flavor but still creamy and satisfying.
- Pasta: Use gluten-free or chickpea pasta if needed. They’ll cook similarly but might have a different bite and flavor profile.
- Fresh Peas: If fresh aren’t available, frozen peas work just fine—just cook a minute longer until tender and bright green.
- Garlic: Substitute with garlic powder or shallots for a milder, more subdued aroma, especially if you’re sensitive to raw garlic’s punch.
- Lemon Juice: Lime juice can replace lemon for a slightly different citrus brightness—think more tropical, less zesty.
- Olive Oil: Butter or avocado oil can be used instead, adding richness or a clean, neutral flavor. Adjust quantity for best gloss.
Equipment & Tools
- Large pot: Boil pasta evenly and efficiently.
- Blender: Puree peas and cream for smooth sauce.
- Large skillet: Sauté peas and garlic, combine pasta.
- Tongs: Toss and serve pasta without breaking it.
- Measuring spoons: Accurately measure lemon juice and seasonings.
- Fine sieve: Drain pasta without losing smaller pieces.
Step-by-step guide to creamy pea pasta
- Equipment & Tools: Boil-proof pot for pasta, blender for sauce, large skillet for sautéing, tongs for tossing, measuring spoons, and a fine sieve for draining pasta.
- Bring a large pot of salted water to a rolling boil—about 4 liters (1 gallon), 100°C/212°F. Add the pasta and cook until just al dente, about 8-10 minutes. Drain, reserving ½ cup of pasta water.
- While pasta cooks, heat a tablespoon of olive oil in a large skillet over medium heat (about 160°C/320°F). Add minced garlic and sauté until fragrant, about 30 seconds. Do not let it brown or it turns bitter.
- Add fresh peas (about 1 cup) to the skillet, cook for 2-3 minutes until they’re bright green and slightly tender. If using frozen, cook for a minute longer until warmed through. The peas should pop with freshness when pressed.
- Pour in ½ cup heavy cream, stirring to combine. Let it warm, about 1-2 minutes, until it starts to thicken slightly and coats the peas. If too thick, add a splash of reserved pasta water until it reaches a velvety consistency.
- Toss cooked pasta directly into the skillet. Mix well, ensuring the sauce coats every strand and the peas are evenly dispersed. Adjust seasoning with salt and pepper. For a brighter flavor, squeeze a little lemon juice over the top, about 1 teaspoon.
- Check the texture: the pasta should be glossy, the peas vibrant, and the sauce creamy but not gloopy. If it’s sticking or too thick, loosen with more reserved pasta water. If too thin, let it simmer for a minute to tighten up.
- Remove from heat. Rest for 1 minute to let flavors meld. Finish with a drizzle of olive oil or a sprinkle of grated Parmesan if desired. Serve immediately, garnished with fresh herbs if you like.
Let the pasta sit off heat for a minute to settle. Finish with a drizzle of olive oil or a sprinkle of cheese. Serve hot, straight from the skillet onto warm plates, ensuring a good distribution of peas and sauce.
How to Know It’s Done
- Pasta is al dente, with a slight bite.
- Peas are vibrant and tender, not mushy.
- Sauce is velvety, coats the pasta evenly.
Creamy Fresh Pea Pasta
Ingredients
Equipment
Method
- Bring a large pot of salted water to a rolling boil, then add the pasta. Cook until just al dente, about 8-10 minutes, until it’s firm yet tender.
- While the pasta cooks, heat one tablespoon of olive oil in a large skillet over medium heat. Add the minced garlic and sauté for about 30 seconds until fragrant, with a subtle sizzling sound and a golden hue.
- Add the fresh peas to the skillet and cook for 2-3 minutes, stirring gently. You’ll see the peas turn bright green and start to pop, releasing a sweet aroma.
- Pour in the heavy cream, stirring to combine with the peas and garlic. Let it warm for 1-2 minutes until the sauce begins to thicken slightly and coats the peas evenly.
- Reserve ½ cup of the pasta cooking water, then drain the pasta using a fine sieve. Immediately add the hot pasta to the skillet with the sauce, tossing gently with tongs to coat each strand evenly.
- Squeeze the lemon juice over the pasta and season with salt and pepper to taste. Toss again to distribute the flavors, letting the sauce cling to the pasta, and add a splash of the reserved pasta water if the sauce seems too thick.
- Cook for another minute, until everything is heated through and the sauce is velvety and glossy. The peas should be vibrant and tender, and the pasta coated beautifully.
- Remove from heat, drizzle with a little extra olive oil if desired, and serve immediately. Enjoy your spring-inspired, creamy pea pasta, packed with fresh flavor and bright textures.
Pro tips for creamy pea pasta
- Bolded mini-head: Use fresh peas when in season—they have a sweeter, more vibrant flavor and a satisfying pop.
- Bolded mini-head: Cook pasta just shy of al dente; it will finish cooking in the sauce, absorbing all those flavors.
- Bolded mini-head: Sauté garlic until fragrant, about 30 seconds—bitter or burnt garlic will ruin the dish’s brightness.
- Bolded mini-head: Add lemon juice at the end; it brightens the entire dish and balances the richness of the cream.
- Bolded mini-head: Reserve a cup of pasta water before draining—it’s your secret weapon for adjusting sauce consistency.
- Bolded mini-head: Toss pasta directly into the sauce in the skillet; this helps the sauce cling and develop a velvety coating.
Common mistakes and how to fix them
- FORGOT to stir peas after adding cream → Stir constantly to prevent sticking or burning.
- DUMPED hot pasta into cold water → Toss pasta directly into sauce for better flavor absorption.
- OVER-TORCHED garlic → Sauté garlic over medium heat, about 30 seconds, to avoid bitterness.
- SKIPPED saving pasta water → Reserve pasta water to adjust sauce consistency if needed.
Quick kitchen fixes
- If sauce looks grainy, splash in hot pasta water and stir vigorously to smooth it out.
- When peas are overcooked and mushy, drain and quickly toss with ice water to halt cooking.
- Splash a bit of lemon juice when sauce is dull; it brightens the flavor instantly.
- Patch sticking pasta by stirring in reserved pasta water until the sauce loosens and shimmers.
- Shield garlic from burning by lowering heat immediately and adding a splash of oil or butter.
Prep, store, and reheat tips
- Prep the peas: Shell fresh peas or measure out frozen ones ahead; they stay bright and sweet for up to 2 days in the fridge.
- Cook pasta in advance: Cook until al dente, drain, and toss with a tiny bit of oil. Store in an airtight container for up to 24 hours to prevent sticking.
- Make the sauce ahead: Puree peas and cream mixture, then refrigerate in a sealed jar for up to 1 day. The flavor intensifies slightly overnight.
- Reheat gently: Warm the sauce in a skillet over low heat, stirring often, until the peas are lively and the aroma of garlic and lemon is fresh—about 3-5 minutes. Add a splash of pasta water to loosen if needed.
- Taste and adjust: After reheating, taste for brightness and creaminess. Squeeze fresh lemon and adjust salt as needed to refresh the dish.
Common Questions About Creamy Pea Pasta
1. Can I use frozen peas instead of fresh?
Fresh peas give a sweeter, more vibrant flavor and pop than frozen, but frozen still works well.
2. Can I substitute the cream with something lighter?
Using heavy cream creates a rich, velvety sauce. Half-and-half is lighter but still tasty.
3. How should I cook the pasta for best results?
Cook pasta until just shy of al dente; it will finish cooking in the sauce, absorbing flavors.
4. When should I add lemon juice?
Add lemon juice at the end to brighten the dish and balance the richness of the cream.
5. Why should I save pasta water?
Reserve some pasta water before draining; it helps loosen the sauce if it gets too thick.
6. What pasta shape works best for this dish?
Use short, ridged pasta shapes like fusilli or orecchiette to hold onto the sauce better.
7. How do I prevent garlic from burning?
To avoid burning garlic, sauté over medium heat just until fragrant, about 30 seconds.
8. What if my sauce looks grainy?
If the sauce gets grainy, add a splash of hot pasta water and stir vigorously.
9. How do I reheat leftovers without ruining the sauce?
Reheat the sauce gently in a skillet over low heat, stirring often, to keep it smooth.
10. Should I use fresh or bottled lemon juice?
Use fresh lemon juice for the brightest flavor. Bottled lemon juice is less vibrant.
This dish feels like a quiet victory—simple, fresh, and deeply satisfying. It reminds me that sometimes, the best flavors come from just a few good ingredients and a bit of care.
Sharing this with friends or family makes it even more special, especially when those bright green peas catch the light and the aroma of garlic wafts through the kitchen. It’s a little moment of spring, all year round, in a bowl.

Hi, I’m Isabella Cury, the creator behind Elevating Simple. Food has always been my passion, but it’s not just about creating meals—it’s about taking everyday ingredients and transforming them into something extraordinary.
My journey in the culinary world has been a blend of education, dedication, and a deep love for sharing food with others. Through this blog, I aim to inspire people to find joy in simple, flavorful cooking.


