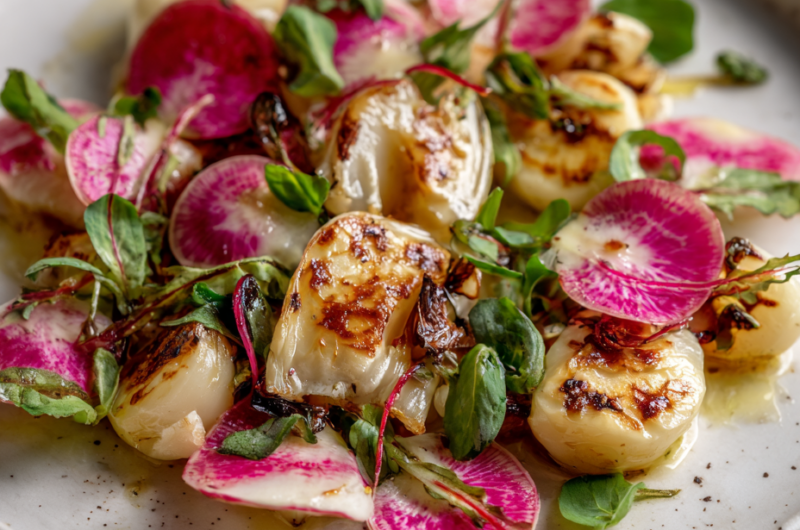
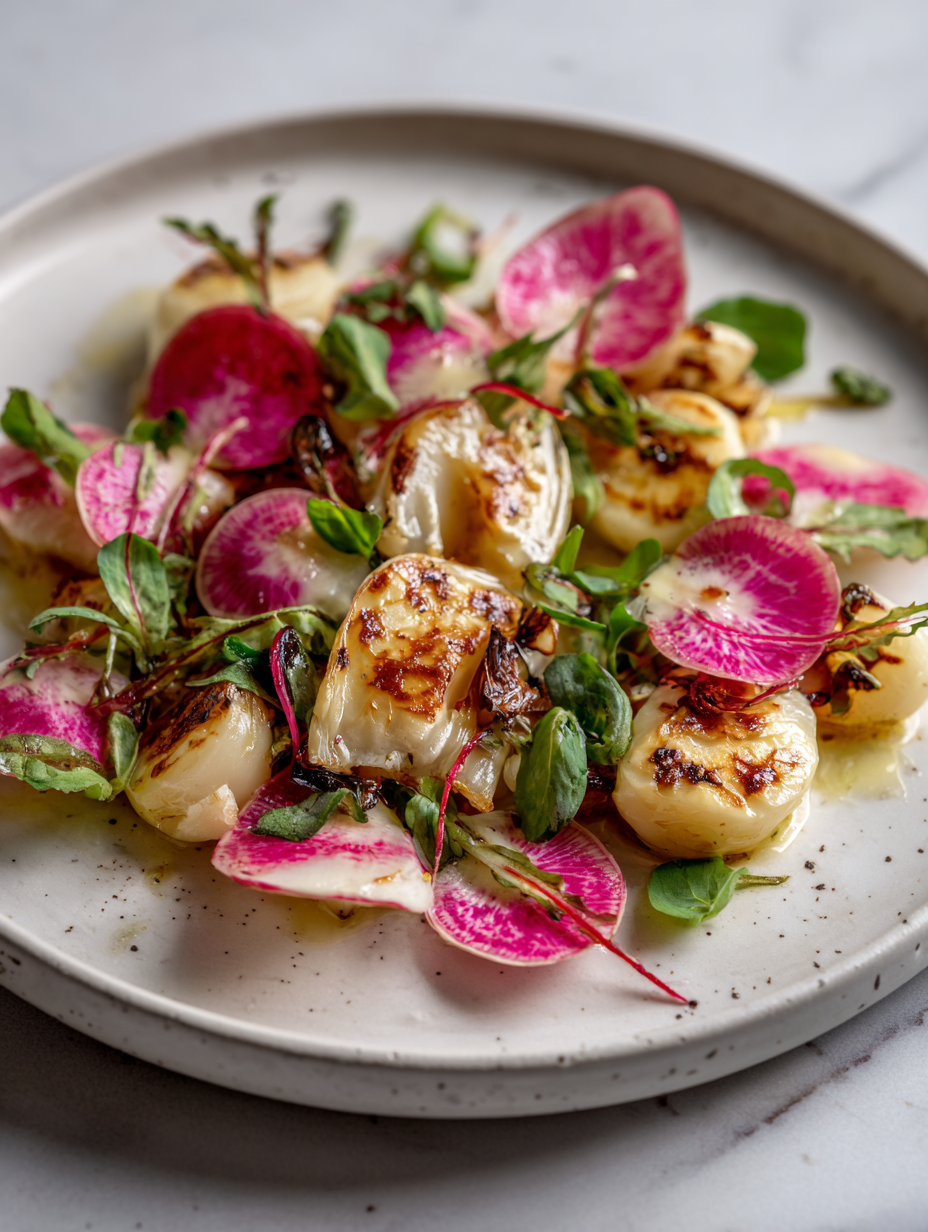
Roasting garlic with radishes is a small trick that totally changes how they taste. The sharp bite of raw radishes mellows into a smoky, almost caramelized sweetness, while the garlic becomes soft and fragrant. It’s like giving humble roots a little bit of luxury without fussing too much in the kitchen.
This recipe started as an experiment when I had a bunch of radishes that looked too good to eat raw but felt a bit plain. Roasting them with garlic turned out to be a revelation—simple, satisfying, and surprisingly elegant on a weeknight table. It’s one of those dishes that makes you wonder why you don’t do this more often, especially when you want something warm and flavorful with almost no effort.
Focusing on how roasting garlic alongside radishes transforms their sharpness into a mellow, smoky sweetness, making this humble root vegetable unexpectedly luxurious.
The inspiration behind this dish
- I first stumbled upon roasting radishes with garlic during a frantic weeknight dinner. I was skeptical—radishes seemed so sharp and raw, not something I’d turn to for comfort. But roasting changed everything. The heat mellowed their pungency into a smoky sweetness that made me pause in surprise. From then on, I started craving that deep, roasted flavor over the raw bite.
- One chilly evening, I tossed a bunch of radishes into the oven just to see what would happen—no grand plan, just curiosity. The smell of garlic and roasting roots filled the kitchen, and I knew I had something special. It’s become a go-to when I want something quick, earthy, and unexpectedly rich, especially when those radishes are fresh and crisp out of the market.
- heading: ‘The story behind this recipe’
Ingredient breakdown: key components
- Radishes: I love how their peppery bite mellows when roasted, turning tender and slightly sweet—look for firm, bright radishes with crisp skin, and don’t skip the greens if fresh—they add a nice peppery contrast.
- Garlic: Roasting transforms raw garlic into a silky, mellow paste that infuses everything with a smoky aroma—use fresh heads, and if you want a more intense flavor, add extra cloves, but watch for burning at the edges.
- Olive oil: I prefer a good-quality extra virgin oil that crisps up the edges beautifully and brings a fruity undertone—if you only have light oil, the flavor will be more neutral, but still good.
- Salt: I use flaky sea salt, which adds a satisfying crunch and enhances sweetness—if you’re watching sodium, a pinch of kosher salt works just as well.
- Pepper: Freshly cracked black pepper adds a subtle heat and depth—don’t be shy, grind it generously for that pungent kick that balances the sweetness.
- Herbs (optional): A sprinkle of thyme or dill at the end can brighten the dish — use fresh herbs for maximum aroma, or dried if that’s what you have, just add it toward the end to keep the flavor lively.
Spotlight on key ingredients
Radishes:
- I love how their peppery bite mellows when roasted, turning tender and slightly sweet—look for firm, bright radishes with crisp skin, and don’t skip the greens if fresh—they add a nice peppery contrast.
- ingredient
Garlic:
- Roasting transforms raw garlic into a silky, mellow paste that infuses everything with a smoky aroma—use fresh heads, and if you want a more intense flavor, add extra cloves, but watch for burning at the edges.
- ingredient
Notes for ingredient swaps
- Radishes: I stick with fresh, firm radishes for that crisp bite and peppery punch—if yours are soft or wilted, they won’t hold up well. Skip if you want a milder, less spicy note.
- Garlic: Roasting transforms raw garlic into a sweet, mellow paste—if you don’t have garlic, shallots or leeks can add a gentle sweetness, but won’t give that smoky aroma.
- Olive oil: A good extra virgin oil crisps beautifully and adds depth—if you only have vegetable oil, it’ll still roast fine, but the flavor won’t be as rich.
- Salt: Flaky sea salt adds crunch and brightness—if you prefer, use kosher salt, just remember to adjust the amount for taste since it’s less dense.
- Pepper: Freshly cracked black pepper provides a pungent kick—if unavailable, crushed red pepper flakes add heat, but less complexity.
- Herbs (optional): Fresh thyme or dill elevate the dish—dried herbs work in a pinch, just add them towards the end to preserve their aroma.
- Vinegar (optional): A splash of balsamic or apple cider vinegar brightens flavors—skip if you want a more subdued, earthy profile.
Equipment & Tools
- Oven: To roast the radishes evenly at high heat.
- Baking sheet: To hold the radishes during roasting.
- Mixing bowl: To toss the radishes with oil and seasonings.
- Knife: To trim and cut the radishes for even cooking.
- Spatula: To toss and turn the radishes during roasting.
Step-by-step guide to roasting radishes
- Preheat your oven to 200°C (390°F). Gather a baking sheet, a mixing bowl, and a knife. The oven needs to be hot enough to caramelize the sugars in radishes.
- Trim the radishes: Cut off the greens if attached, and slice larger radishes in half or quarters for even roasting. Toss in a bowl with 2 tbsp olive oil, 4 cloves minced garlic, 1 tsp flaky sea salt, and freshly cracked black pepper. Mix well until all pieces are coated.
- Arrange the radishes on the baking sheet in a single layer. Spread them out so they aren’t crowded—this helps them crisp and caramelize.
- Roast for 20-25 minutes. Halfway through, toss them gently with a spatula. Look for a golden-brown edge and a soft, slightly blistered surface. The garlic should be fragrant and starting to turn golden.
- Check for doneness: Radishes should be tender and caramelized at the edges. The garlic should be soft and fragrant, not burnt. If they’re too firm, roast a few more minutes.
- Remove from oven. Let rest for 2 minutes. If desired, sprinkle with fresh herbs like thyme or dill for brightness. Serve warm, with a drizzle of extra olive oil if you like.
Let the radishes sit for a couple of minutes to settle their flavors. Drizzle with extra olive oil or herbs if desired. Plate them directly on a serving dish, and enjoy the smoky, tender bite.
How to Know It’s Done
- Radishes are tender and caramelized, with golden edges.
- Garlic is soft, fragrant, and slightly browned, not burnt.
- Radishes jiggle slightly when shaken, indicating doneness.
Roasted Garlic and Radishes
Ingredients
Equipment
Method
- Preheat your oven to 200°C (390°F). Prepare a baking sheet and set aside.
- Trim the greens from the radishes if attached, then cut larger radishes in half or quarters to ensure even roasting.
- In a mixing bowl, toss the radishes with olive oil, minced garlic, salt, and a generous crack of black pepper until all pieces are evenly coated.
- Arrange the coated radishes in a single layer on the prepared baking sheet, making sure they aren’t crowded to promote proper caramelization.
- Place the baking sheet in the oven and roast for 20-25 minutes, tossing gently halfway through, until the radishes are golden at the edges and tender when pierced.
- While the radishes roast, smell the fragrant garlic slowly turning soft and golden, filling the kitchen with a smoky aroma.
- Once cooked, remove the radishes from the oven, and sprinkle with chopped herbs if using, to add freshness and color.
- Serve the radishes warm, drizzled with any leftover oil or herbs, allowing the smoky sweetness and tender texture to shine through.
Notes
Pro tips for perfect garlic roasted radishes
- Bold garlic: Use freshly minced garlic for a robust, fragrant aroma that deepens as it roasts—avoid pre-minced jars which can taste dull and stale.
- High heat: Roast at 200°C (390°F) for that perfect balance of caramelization and tenderness—lower temps won’t develop the smoky sweetness as effectively.
- Even spacing: Arrange radishes in a single layer with space between—crowding leads to steaming, not roasting, and less crisp edges.
- Watch the garlic: Keep an eye as it roasts; it can go from golden to burnt quickly—remove once fragrant and lightly browned to avoid bitterness.
- Toss midway: Turn radishes about halfway through roasting to promote even caramelization and prevent sticking or burning on one side.
- Use parchment: Lining your baking sheet with parchment prevents sticking and makes cleanup easier—especially helpful if garlic starts to crisp too much.
- Rest briefly: Let roasted radishes sit for 2 minutes after coming out of the oven—this helps juices redistribute and enhances flavor.
Common mistakes and how to fix them
- FORGOT to preheat oven → Ensure oven is fully heated before roasting.
- DUMPED radishes too close → Spread evenly for proper caramelization and crisp edges.
- OVER-TORCHED garlic → Keep an eye to prevent burning; remove once fragrant and golden.
- MISSED resting time → Allow radishes to sit briefly after roasting to settle flavors.
Quick fixes and pantry swaps
- When radishes are soggy, splash them with lemon juice to brighten and crisp.
- If garlic burns, patch with a fresh clove and a drizzle of oil to save flavor.
- DUMPED too much oil? Shake off excess to prevent greasy radishes.
- Overcooked radishes turn mushy—rescue by tossing in fresh herbs and a squeeze of lemon.
- If oven smoke shutters up, shield with a foil tent and ventilate immediately.
Prep, store, and reheat tips
- Prepping radishes: Trim and cut radishes into halves or quarters a day ahead, then store in an airtight container in the fridge; they stay crisp for up to 2 days.
- Garlic can be minced and kept in a small jar or container in the fridge for up to 3 days—its aroma intensifies over time, so plan accordingly.
- Roasted radishes are best enjoyed fresh, but you can reheat leftovers in a 180°C (350°F) oven for 5-7 minutes until warm and slightly crispy; avoid microwaving to preserve texture.
- Store leftovers in an airtight container in the fridge for up to 2 days. The radishes will soften slightly, and the smoky flavor will mellow over time.
- Reheating will intensify the sweetness and smoky aroma, but be careful not to overcook or burn the garlic during reheating—watch for a gentle crackle and fragrant smell.
Top questions about garlic roasted radishes
1. What does roasting do to radishes?
Roasted radishes develop a tender, slightly caramelized interior with a smoky, sweet flavor, balancing their usual peppery bite.
2. How does garlic change when roasted with radishes?
The garlic becomes soft, fragrant, and mellow, adding a smoky, almost buttery depth that complements the radishes perfectly.
3. Can I use other vegetables instead of radishes?
Yes, you can substitute with other roots like parsnips or carrots, which will also caramelize nicely but will have a different flavor profile.
4. What kind of radishes should I choose?
Use fresh, firm radishes with bright skins and crisp greens. Avoid those that are wilted, soft, or discolored for the best results.
5. Can I omit garlic or add other herbs?
You can skip the garlic or add herbs like thyme or dill at the end to vary the flavor and add freshness.
6. How do I know when the radishes are done?
Roast until radishes are tender and golden at the edges, and the garlic smells fragrant and slightly browned, about 20-25 minutes.
7. How long do roasted radishes keep and how to reheat?
Store leftovers in an airtight container in the fridge for up to 2 days. Reheat in a warm oven or skillet until just heated through, watching for the garlic to become fragrant again.
8. What if my garlic burns?
If the garlic burns during roasting, remove it immediately, or reduce oven temperature slightly and roast for a longer time to prevent bitterness.
9. How to fix bland roasted radishes?
Splashing radishes with lemon juice or vinegar can brighten their flavor and add a fresh zing if they taste flat after roasting.
10. What oil and salt should I use?
Use high-quality olive oil for deep flavor and crispy edges. Flaky sea salt adds crunch and enhances sweetness, so don’t skimp on seasoning.
This simple dish proves that humble radishes can surprise you with their smoky, sweet side when roasted with garlic. It’s a straightforward way to elevate a vegetable that often gets overlooked raw. The aroma alone—garlic and caramelized radish—makes your kitchen feel warm and inviting.
Plus, it’s flexible and forgiving, perfect for busy nights or when you want something flavorful without fuss. Once you taste the tender, aromatic radishes, you might find yourself reaching for this recipe again and again, especially in the spring when radishes are at their best.

Hi, I’m Isabella Cury, the creator behind Elevating Simple. Food has always been my passion, but it’s not just about creating meals—it’s about taking everyday ingredients and transforming them into something extraordinary.
My journey in the culinary world has been a blend of education, dedication, and a deep love for sharing food with others. Through this blog, I aim to inspire people to find joy in simple, flavorful cooking.


